Chickpea Fritters

Xīnnián Kuàilè!

Angie (The Novice Gardener) has started her blog event ‘Fiesta Friday‘ auspiciously on the Chinese New Year. So, Wishing you all a happy Lunar New Year and a wonderful party at Angie’s fiesta!

A Taste of Sri Lankan Cuisine’s contribution to the event is this snack recipe of my mother’s – chickpea fritters, which is a very popular snack both in Sri Lanka and India.

Chickpea fritters

Time taken: 30 mins + 3 hours (soaking time)

Serves 8

DSC01041Ingredients:

  • Split chickpea/ kadalai paruppu – ½ cup
  • Chickpea flour – ½ cup
  • Wheat flour – ¼ cup (optional)
  • Onion – 1, chopped
  • Turmeric – ¼ tsp
  • Crushed chillies – 1 to 2 tsp
  • Curry leaves – 1 sprig
  • Carom/ Omam seeds – ½ tsp
  • Salt
  • Low fat oil, for deep-frying

Method:

  1. Soak the chickpea for about 3 hours.
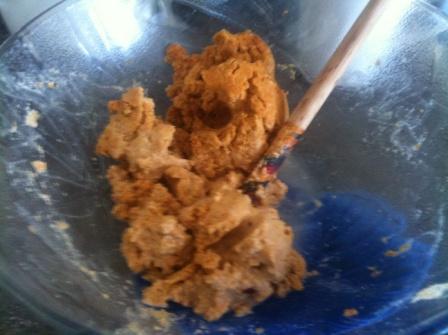
  2. Then, coarsely grind it, i.e. do not grind it to a puree or flour but rather half-grind it so that there are smaller bits of chickpea. Transfer to a mixing bowl.
  3. Add the rest of the ingredients to the bowl and make the fritter dough.
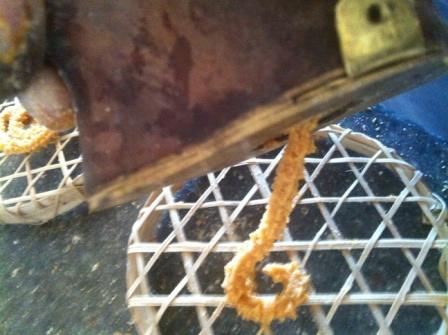
  4. Heat the oil in a pan until it sizzles.
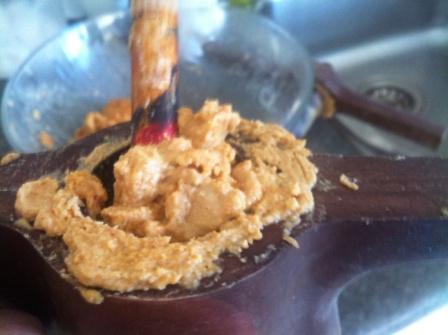
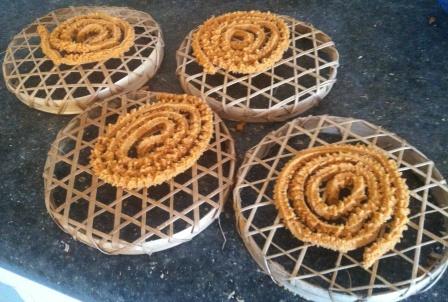
  5. Pinch off a little dough at a time and drop it in the pan. Fry till the fritters are golden brown.
  6. Serve with tea.

Recipe source: Raji Thillainathan.

Murukku

Today’s guest blogger is Krishanthy Kamalraj. An agriculture graduate and a former staff member of UNDP Sri Lanka’s Transition Recovery Programme, Krishanthy sent me a couple of recipes this week. As one of the recipes is for Pongal, I am happy to share her murukku recipe today. 

Kadalaima Murukku- Channa Dhal flour murukku

This snack has a prominent place in all Tamil celebrations. There are several types of murukku available and they differ based on ingredients. Today I have chosen Channa Dhal flour and Atta flour murukku.

Time taken: 1 hour

Serves 10 to 15 persons

Ingredients:

  • 1 cup roasted channa dhal flour
  • ½ cup steamed wheat flour
  • 1 teaspoon of cumin
  • 2-4 dried red chili
  • 1 teaspoon of Omam (Carom seeds/ Ajwain) powder
  • 2 teaspoon margarine or olive oil
  • ½ cup water
  • Salt as needed
  • Oil to fry
  • Murukku ural/ mould

Method:

  1. Soak the Omam powder in 1/8 cup of water for 30 minutes.
  2. In a mixing bowl, take 1 cup of roasted Channa Dhal flour and ½ of steamed Atta flour and add together.
  3. Take cumin and dry chili and grind it well until it becomes a fine powder. Add this to the flour mixture in the bowl and mix well.
  4. Filter the Omam water and gradually add to flour mixture.
  5. Then add salt and margarine to the flour mixture.
  6. Gradually add water to the mixture and make very soft, non sticky dough (same as the consistency level for string hopper dough)

murukku dough2

murukku in the mould

7. Insert clove shape disc into bottom of murukku ural and add small portion of dough into the murukku ural and press softly to make coil shaped murukku. Note: If the dough is not soft enough (due to not enough water), it will feel hard to press the ural. Add little bit of water and make the dough soft. This will result in very soft murukku.

squeezing the murukku

murukku dough

8. In a pan take required amount of oil and heat it over medium heat.
9. Once the oil is hot enough, transfer the pressed murukku into the oil.

frying murukku10. Once the murukku is cooked well on both side and has turned light golden brown in colour, take it out from the pan and drain the grease using paper towel.

Murukku

11. Keep them in an air tight container and serve whenever you feel like eating crispy, spicy snack.

Recipe source: Krishanthy Kamalraj.

Steamed rice cakes

Wishing everyone a happy New Year! To start the Year on a sweet note, today’s recipe is that of steamed rice cakes.

Steamed rice cake

Time taken: 30 mins + 2 hours (for soaking)

Makes 6 cakes

Steamed rice cakeIngredients:

  • Rice – ½ cup
  • Urad dhal/ black gram flour – 2 tbsp, roasted
  • Coconut – 2 tbsp, freshly scraped
  • Sugar – 1 ½ tbsp
  • Baking powder – 1 tsp
  • Salt – pinch
  • Food colouring/ essence – optional

Method:

  1. Soak the rice in water for about 2 hours and then grind it to make a batter.
  2. Add the roasted urad dhal flour, scraped coconut, sugar, baking powder and salt to the batter. Mix well.
  3. If you would like your steamed cakes in different colours, divide the batter into separate bowls. Add the different food colours to each of the bowl. Here, my mother used green and red.
  4. Steam the batter for about 10 – 15 mins.
  5. Serve warm with tea. You could serve some honey or jam on the side, should you like it more sweeter.

Recipe source: Raji Thillainathan.

Vegan Christmas Cake

Last week, my mother decided to bake her special vegan christmas cake. While I was initially planning to share this recipe on the 25th, I am sharing it ahead at my mother’s request. It is a delightful cake and I am sure you will enjoy it, if you do try it.

Christmas cake veganVegan Christmas Cake

Vegan christmas cake slicesTime taken: 3 hours

Makes 20 slices

Christmas cakeIngredients:

  • Dates – 1 cup, chopped
  • Raisins – ½ cup
  • Cashewnuts – ¼ cup
  • Almonds – ¼ cup, chopped
  • Caramelized peanuts – ½ cup
  • Cherry – ¼ cup, chopped
  • Chow chow (choko) – ½ cup, chopped
  • Ginger preserve – 1 tbsp
  • Puhul dosi (pumpkin preserve) – ¼ cup, chopped
  • Lemon rind – 1 tsp
  • Orange peel preserve – 1 tbsp
  • Mixed peel – ½ cup
  • Coconut treacle – 4 tbsp
  • Caramel syrup – ¼ cup
  • Almond oil – 3 tbsp
  • Vegetable oil – ¼ cup
  • Mixed spice (Cardamom, Cinnamon, Cloves) – 2 tsp
  • Thick tea – 1 tbsp
  • Semolina – ½ cup
  • Flour – ½ cup
  • Baking powder – 1 tsp
  • Baking soda – 2/3 tsp
  • Rose essence – ¼ tsp

Method:

  1. Chop all the ingredients mentioned above (dates, raisins, cashewnuts, peanuts, almonds, chow chow, lemon rind, orange peel preserve, mixed peel, ginger preserve, cherries and puhul dosi/ pumpkin preserve) and mix together in a bowl.
  2. To the bowl, add the liquids stirring them in as you do so. Add the honey, caramel syrup and thick tea and let it soak for about ½ hour.
  3. Mix well before adding the vegetable oil and almond oil. Add the rose essence and cinnamon, cardamom and clove mixed spice to the bowl.
  4. Gradually stir in the semolina.
  5. Sift the flour with the baking powder and soda and add the flour mix to the bowl.
  6. Whisk the contents of the bowl together so that there are no flour lumps anywhere.
  7. Transfer the cake batter to the baking tray and bake at 120⁰C/248⁰F for 1 to 1 ½ hour till the cake is browned at the top and the cake is baked through.
  8. After the cake cools, cut the cake into pieces and wrap the pieces into Christmas wrappings.

Recipe source: Raji Thillainathan.

Mango Juice

Accompanying the mango kesari is one of my favourite fruit juices – mango juice.

Mangoes have high levels of vitamin C and A and a generous amount of antioxidant compounds, iron and calcium but it would be wise to consume mangoes in moderation as they are also recommended for those seeking to gain weight.

While I usually like a simple juice by blending the fruit with water, I did like my mother’s version recently.

Mango juiceIngredients (for 1 cup):

  • Mango – ½ cup, chopped
  • Orange juice – 1 tbsp
  • Mint – 2 or 3 leaves
  • Sugar – 1 tsp

Method:

Simply blend all the ingredients together with water and then sit back and enjoy a delicious drink.

Mango Kesari

Today’s lovely recipe is my mother’s recipe for mango kesari/ halwa. Great with a cup of tea or coffee.

Mango Kesari

Time taken: 20 mins

Serves 4

Mango KesariIngredients:

  • Mango – ½ cup, chopped
  • Orange juice – 1 tbsp
  • Mint – 2 or 3 leaves
  • Sugar – 1 tsp (for juice) + 1 tbsp
  • Salt – a little
  • Semolina – ¼ cup
  • Vegetable oil margarine – 1 tsp
  • Vanilla essence – 1 tsp
  • Yellow food colouring – ½ tsp (optional)
  • Nuts (your choice) – optional

Method:

  1. Make 1 cup of mango juice by blending the chopped mango, orange juice, mint leaves, 1 tsp of sugar and pinch of salt with water.
  2. Heat the juice in a saucepan with a tbsp of sugar for about 2 mins. Add the vanilla and semolina. Continue stirring until it thickens.
  3. Add 1 tsp of margarine and the optional yellow food colour and nuts. Mix well before transferring to a tray or mold so that it can set.
  4. Serve warm with tea or after a meal.

Recipe source: Raji Thillainathan.

Ash plantain and Onion Fritters

Today’s recipe is a lovely snack – fritters. I like the ash plantain fritters more than the onion ones.

Ash plantain and Onion fritters

Time taken: 40 mins

Serves 4

Ash plantain and onion frittersIngredients:

  • Ash plantain – 1
  • Onion – 1
  • Wheat flour – ½ cup
  • Salt – ½ tsp
  • Chilli powder – ½ tsp
  • Turmeric powder – ½ sp
  • Pepper – ½ tsp
  • Low fat oil, for deep-frying

Method:

  1. Boil the ash plantain and then peel. Slice the cooked plantain lengthwise into 4.
  2. Peel the onion and slice them, such that the rings in each slice do not fall apart.
  3. Make the batter by mixing the wheat flour, chilli powder, turmeric, salt and pepper with ½ cup of water.
  4. Dip the ash plantain and onion slices into the batter, coating them well.
  5. Deep-fry the batter coated ash plantain and onion slices until golden brown on both sides.
  6. Serve warm with tea or as a side-dish at lunch lunch.

Recipe source: Raji Thillainathan.

Panangkatti

I wanted to share one more palmyrah product this week. I will wrap up the palmyrah recipe series with ‘panangkatti’ or palmyrah sugar. During my great-grandmother’s time, ‘panangkatti’ was considered the regular sweetener for cooking and beverages and not the processed sugar of today. My mother recollects her grandmother serving her tea with a piece of panangkatti.

Very rich in nutrients and a good source of vitamin B12, ‘panangkatti’ is considered particularly good for diabetic patients as well as those seeking to reduce their weight. Whenever I travel to Jaffna, I always try to bring my parents some good ‘panangkatti’ as the best in the country is available only there and both my parents are diabetic.

While there are some people like my parents who prefer ‘panangkatti’ to regular sugar, its usage in the country has been on the decline over the last couple of decades. Therefore, its production has also reduced while the prices have gone up and it is now much more expensive than the regular sugar one can buy in any store.

This is what my mother remembers of her grandmother’s recipe for making panangkatti, for those interested in knowing how it is made. The accompanying photo is of some ‘panangkatti’ that my mother had bought last week from Katpaham.

PanangkattiPanangkatti

Ingredients:

  • Palmyrah sap – ½ cup
  • Rice flour – 1 tbsp

Method:

  1. Stir the palmyrah sap (palm water) continuously in the pot over medium heat, till it thickens beyond the consistency required for ‘paani‘.
  2. Add a tbsp of rice flour and continue stirring till its consistency becomes denser and it is no longer watery.
  3. Scoop a tbsp of the ‘panangkatti’ mixture into the woven palmyrah leaf thimbles and let it cool and set.
  4. Store the ‘panangkatti’ thimbles in an air-tight container.

Recipe source: Raji Thillainathan.

Pumpkin cutlet

For some odd reason, I posted this on Oct 28th instead of Nov 28th so I am re-posting it today. 

I guess I have some pleasant memories of Thanksgiving dinners of past years that I tend to personally take note of the day. Last year’s Thanksgiving dinner was a memorable one with three special friends at Mount Kilauea, after we watched the crater eruptions from a very safe distance. My very first Thanksgiving dinner, a little over a decade ago, was hosted by a special vegetarian couple so much so that Thanksgiving food for me has since meant an opportunity to explore creative ways of incorporating pumpkin into everything from starters to dessert. 

So, today, I will share another of my mother’s pumpkin recipes.

Pumpkin cutlet

Time taken: 30 mins

Makes 6

pumpkin cutletIngredients:

  • Pumpkin – 2 cups, ripe and boiled
  • Onion – 1, small
  • Green chilli – 1
  • Pepper – 1 tsp
  • Wheat flour – 3 tbsp
  • Bread crumbs
  • Low fat oil, for deep-frying

Method:

  1. Remove peel of boiled pumpkin and mash it in a bowl. Add a bit of salt.
  2. Finely chop up the onion and green chilli. Add them to the bowl of mashed pumpkin.
  3. Add the pepper to the bowl. Mix well.
  4. Divide the pumpkin mixture into six portions.
  5. Mix 3 tbsp of wheat flour in some water to make a watery batter.
  6. Dip the pumpkin ball in the batter and then roll it in the bread crumbs so that the pumpkin cutlet is well coated. Repeat for each of the 6 cutlets. Set aside on plate while the oil is heated for deep-frying.
  7. Heat the oil over low heat. Deep-fry the cutlets until they are golden-brown.
  8. Transfer to a plate lined with grease absorbing paper and serve hot.

Recipe source: Raji Thillainathan.

Panaattu

‘Panaattu’ is considered to have high levels of vitamins A and E. As far as my mother is concerned, it is something she has been fond of ever since she was a toddler. She bought a slab of ‘panaattu’ from the Katpaham outlet here so that I could take a photograph but she finds that it does not have the colour or consistency that her grandmother’s used to have. It is the first time that I have tasted ‘panaattu’ so I can’t compare.

PanaattuHere’s the method my great-grandmother used to make panaattu, as remembered by my mother from her childhood days. I am sharing it for those who are interested in knowing what or how ‘panaattu’ is made and for those who happen to have some palmyrah fruit and wish to try making some panaattu. For more ways that the palmyrah is used in the north of Sri Lanka, check out my earlier post on its background.

Ingredients:

Palmyrah fruit – 6, very ripe

Coconut oil, for coating the ‘panaattu’ layer.

Method:

  1. Peel the very ripe palmyrah fruit and then mix repeatedly with just enough water to be able to make the fruit pulp. Strain the pulp through a clean cloth.
  2. Spread the collected pulp as a thin layer over a woven palm mat and let it dry under the sun.
  3. Cover the mat during night.
  4. The next day, add another thin layer of palmyrah fruit pulp extract over the dried layer and continue to sun-dry. Repeat this process for 10 days, adding new thin layers each day till the thickness of the ‘panaattu’ is around ½ inch.
  5. Let the ‘panaattu’ dry under the sun till it reaches a maroonish-orange colour and can be cut through with a knife without it sticking to the knife.
  6. Slice the long panaattu roll into manageable pieces. Apply a little coconut oil and fold the cut pieces.
  7. Taking a woven palmyrah leaf container/ box, stock up the cut and oiled panaattu pieces.
  8. This can be then stored for a long time. My great-grandmother used to store the box of panaattu on a shelf above her cooking stove.
  9. Serve a piece of panaattu with tea or make some paani panaattu from it.

Recipe source: Raji Thillainathan.