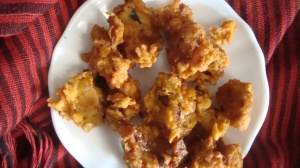
Chickpea Fritters

Xīnnián Kuàilè!

Angie (The Novice Gardener) has started her blog event ‘Fiesta Friday‘ auspiciously on the Chinese New Year. So, Wishing you all a happy Lunar New Year and a wonderful party at Angie’s fiesta!

A Taste of Sri Lankan Cuisine’s contribution to the event is this snack recipe of my mother’s – chickpea fritters, which is a very popular snack both in Sri Lanka and India.

Chickpea fritters

Time taken: 30 mins + 3 hours (soaking time)

Serves 8

DSC01041Ingredients:

  • Split chickpea/ kadalai paruppu – ½ cup
  • Chickpea flour – ½ cup
  • Wheat flour – ¼ cup (optional)
  • Onion – 1, chopped
  • Turmeric – ¼ tsp
  • Crushed chillies – 1 to 2 tsp
  • Curry leaves – 1 sprig
  • Carom/ Omam seeds – ½ tsp
  • Salt
  • Low fat oil, for deep-frying

Method:

  1. Soak the chickpea for about 3 hours.
  2. Then, coarsely grind it, i.e. do not grind it to a puree or flour but rather half-grind it so that there are smaller bits of chickpea. Transfer to a mixing bowl.
  3. Add the rest of the ingredients to the bowl and make the fritter dough.
  4. Heat the oil in a pan until it sizzles.
  5. Pinch off a little dough at a time and drop it in the pan. Fry till the fritters are golden brown.
  6. Serve with tea.

Recipe source: Raji Thillainathan.

Garlic and Shallot Curry

Another garlic curry recipe of my mother, this time with shallots. For another version of a garlic curry, do check out the earlier post of the beetroot and garlic curry recipe.

Garlic and Shallot Curry

Time taken: 20 mins

Serves 3

Garlic and Shallot CurryIngredients:

  • Garlic – ¼ cup
  • Shallots – ½ cup
  • Fenugreek seeds – 1 tbsp
  • Tamarind extract – ½ cup
  • Curry powder – 1 tsp
  • Salt, to taste
  • Coconut milk – ¼ cup
  • Sugar – 2 tsp
  • Low fat oil – 1 tbsp

Method:

  1. Clean the garlic and shallots.
  2. Heat 1 tbsp oil in a pan and add the fenugreek seeds. Then, add the shallots and fry for a couple of minutes, before adding the garlic and frying further for a few minutes.
  3. Add the tamarind juice, curry powder and salt to taste to the pan. Mix well and cook for about 5 minutes.
  4. Add the coconut milk and sugar to the pan and cook for another 5 minutes, until gravy thickens and a nice aroma wafts about.
  5. Serve warm with rice or pittu or stringhoppers.

Recipe source: Raji Thillainathan.

FFF

Thank you

Thank you, AJ @ AJ’s Dessert Course, for the nomination. Having bookmarked several of the delectable recipes that AJ has posted on her site, I am honoured to accept the nomination.

shineonWith regard to the seven random things to share as part of the acceptance of the nomination, I decided to share something about my mother this time as she is the main contributor of the recipes on this blog and is a very inspiring person.

  1. My mother has a warm, kind and energetic personality that tends to make people gravitate towards her.
  2. She also enjoys organizing activities and events and is wonderful at bringing together people, no matter how at odds they are with each other.
  3. Her favourite poet is Mahakavi Bharathiyar, a pioneer of modern Tamil poetry.
  4. One of my mother’s favourite short stories is T.F.Powy’s “Lie thee down,oddity.”
  5. She is a wonderful short story writer in Tamil and of course, I am biased.
  6. My mother’s favourite comfort food is fresh bread and steamed vegetables.
  7. My mother is obsessive about her morning and evening walks. I think it was her personal time to collect her thoughts and de-stress away from us when we were children and now, it is mainly for health reasons.

I do admire and enjoy each of the blogs that I follow and look forward to discovering new ones. In the meantime, I nominate the following seven inspiring blogs from the lovely blogs that I follow, for the Shine on award and hope they choose to pass it on.

  • Fig & Quince –  I love the Persian cuisine and culture posts of Team Azita, Fari & Felfeli on their delightful blog and am enjoying trying out the veganized version of the stews and soups posted on the blog.
  • Iceland in the company of heroes – I love the travel stories and photos of Iceland posted on this blog, as described by the Edinburgh university graduate who hitchhiked around Iceland exploring the places described in Njals saga.
  • La petite paniere – Linda’s delightful food blog with many recipes that I have bookmarked to try out.
  • Poppy’s Patisserie – One of my favourite baking blogs and whose recipes I have tried out several times.
  • This is thirty – I admire Laura’s commitment to her passion for running and enjoy her thoughtful posts, plus her gluten-free, vegan recipes.
  • Travel Cathay – Given that I have a special interest in the theme, particularly Yunnan, I love this blog that focuses on ancient and ethnic villages of China.
  • Yallah, bye – I particularly like the sketches and accompanying short narratives of his travels that Nicholas Andriani posts on his blog.

Have a lovely week!

Pudalangai Kulambu

Today’s curry recipe is one of the dishes that I like a lot – pudalangai kulambu or snake gourd curry.

Pudalangai Kulambu

Time taken: 30 mins

Serves 2 or 3

Pudalangai KulambuIngredients:

  • Snake gourd – 1 cup, chopped
  • Onion – ½ , chopped
  • Fenugreek seeds – 2 tsp
  • Curry leaves – 1 sprig
  • Tamarind – ½ cup
  • Coconut milk – ½ cup
  • Curry powder – 1 tsp
  • Salt, to taste
  • Low fat oil – 2 tbsp

Method:

  1. Heat 1 tbsp oil in a pan and fry the onion and fenugreek seeds for a couple of minutes.
  2. Then, add another tbsp oil to the pan and add the chopped snake gourd and curry leaves. Continue frying for a few minutes.
  3. Add the tamarind and milk to the pan, together with the curry powder and salt to taste. Let the curry cook for about 10 – 15 mins over medium heat.
  4. Remove pan from stove when the gravy thickens.
  5. Serve warm with rice or pittu.

Recipe source: Raji Thillainathan.

Cabbage Fritters

Today’s recipe is that of cabbage fritters.

In addition to checking out the recipe below, I would like to invite you to visit this post on one of my other blogs – Perspectives Quilt for a brief introduction about one of my books that can be freely downloaded today on Amazon Kindle.

Cabbage fritters

Time taken: 25 mins

Serves 4 or 5

Cabbage frittersIngredients:

  • Cabbage – ½ cup, shredded
  • Onion – ½, chopped
  • Green chillies – 1 or 2, chopped
  • Crushed red chillies – 1 tsp
  • Chickpea flour – ¼ cup
  • Wheat flour – ¼ cup
  • Ginger – ½ tsp, crushed
  • Garlic – ½ tsp, crushed
  • Salt, to taste
  • Oil, for deep-frying

Method:

  1. Mix all the ingredients, except the oil, together adding a little water to make the fritter dough.
  2. Divide the fritter dough into 4 or 5 portions.
  3. Deep-fry until golden brown.
  4. Serve with rice or as it is.

Recipe source: Raji Thillainathan.

Tomato and Potato Curry

Today’s recipe is a lovely tomato and potato curry, which my mother calls her tomatish potato dish. It is a simple and easy to prepare dish that you will certainly like.

Tomato and Potato Curry

Time taken: 30 mins

Serves 2

Tomatish potatoIngredients:

  • Potato – 1
  • Tomato – 1
  • Onion – ½
  • Green chilli – 1
  • Crushed red chillies – 1 tsp
  • Ginger – ½ tsp, crushed
  • Garlic – ½ tsp, crushed
  • Salt, to taste
  • Low fat oil, for frying

Method:

  1. Boil the potato and then, peel and chop it into smaller pieces.
  2. Lightly fry the potato pieces and keep aside.
  3. Heat a little oil in a pan and lightly fry the chopped green chilli, ginger and garlic. Add the chopped tomato pieces and crushed red chillies to the pan and continue frying for a few minutes.
  4. Remove the pan from the stove and transfer its contents to a blender to grind it to a paste.
  5. Transfer the tomato paste back to the pan and heat it over a low heat.
  6. Add the fried potato pieces to the pan and salt, to taste. Stir well.
  7. Serve the tomato and potato curry with rice or pittu.

Recipe source: Raji Thillainathan.

Murukku

Today’s guest blogger is Krishanthy Kamalraj. An agriculture graduate and a former staff member of UNDP Sri Lanka’s Transition Recovery Programme, Krishanthy sent me a couple of recipes this week. As one of the recipes is for Pongal, I am happy to share her murukku recipe today. 

Kadalaima Murukku- Channa Dhal flour murukku

This snack has a prominent place in all Tamil celebrations. There are several types of murukku available and they differ based on ingredients. Today I have chosen Channa Dhal flour and Atta flour murukku.

Time taken: 1 hour

Serves 10 to 15 persons

Ingredients:

  • 1 cup roasted channa dhal flour
  • ½ cup steamed wheat flour
  • 1 teaspoon of cumin
  • 2-4 dried red chili
  • 1 teaspoon of Omam (Carom seeds/ Ajwain) powder
  • 2 teaspoon margarine or olive oil
  • ½ cup water
  • Salt as needed
  • Oil to fry
  • Murukku ural/ mould

Method:

  1. Soak the Omam powder in 1/8 cup of water for 30 minutes.
  2. In a mixing bowl, take 1 cup of roasted Channa Dhal flour and ½ of steamed Atta flour and add together.
  3. Take cumin and dry chili and grind it well until it becomes a fine powder. Add this to the flour mixture in the bowl and mix well.
  4. Filter the Omam water and gradually add to flour mixture.
  5. Then add salt and margarine to the flour mixture.
  6. Gradually add water to the mixture and make very soft, non sticky dough (same as the consistency level for string hopper dough)

murukku dough2

murukku in the mould

7. Insert clove shape disc into bottom of murukku ural and add small portion of dough into the murukku ural and press softly to make coil shaped murukku. Note: If the dough is not soft enough (due to not enough water), it will feel hard to press the ural. Add little bit of water and make the dough soft. This will result in very soft murukku.

squeezing the murukku

murukku dough

8. In a pan take required amount of oil and heat it over medium heat.
9. Once the oil is hot enough, transfer the pressed murukku into the oil.

frying murukku10. Once the murukku is cooked well on both side and has turned light golden brown in colour, take it out from the pan and drain the grease using paper towel.

Murukku

11. Keep them in an air tight container and serve whenever you feel like eating crispy, spicy snack.

Recipe source: Krishanthy Kamalraj.

Pongal

Happy Thai Pongal! இனிய தைப்பொங்கல் நல்வாழ்த்துகள்!

Tomorrow is Pongal for Tamils around the world. Pongal is a celebration that occurs annually on the first day of the month of ‘Thai’ (Tamil month equivalent to January) and is a harvest festival, traditionally meant to honour the sun. It is also the name of the key rice dish that is made to celebrate most Tamil festivals, but particularly its namesake festival.

I shared a simple recipe of the home-cooking version of Pongal in this post last August. Today, I also wanted to share some of the photos from one of our Pongal celebrations with the families in our apartment building a couple of years back as it is more of a community festival where people get together in the temple or courtyard, or as in this case – the car parking area. I was going to post this tomorrow on the festival day but as one of my friends has sent me a recipe of one of the snacks she makes for Pongal, I decided to post her recipe tomorrow. So, here’s the photo-story of Pongal making.

The kolam (designs made of rice flour paste) is first drawn. Within its boundaries, the traditional Tamil welcome is set up facing north, with the kuthuvillaku/lamps and the coconut with mango leaves placed in the kudam/pot

The kolam (designs made of rice flour paste) is first drawn. Within its boundaries, the traditional Tamil welcome is set up facing north, with the kuthuvillaku/lamps and the coconut with mango leaves placed in the kudam/pot

Water for Pongal

Setting up the Pongal pot facing the rising sun in the east

Milk boiling for pongal

Milk (usually dairy milk but at home, my mother uses coconut milk) is added to the water in the pot

DSC02067

Everyone waits for the milk to boil over – this symbolically means prosperity for all for the coming year (‘Ponguthal’ means boiling over and is the word that festival name and dish derived its name from)

Adding rice to the pot

The rice is then added to the pot – a handful at a time by some of the elders, women and men, present.

Pongal

After the rice is cooked, jaggery, nuts, raisins are added to the pot and stirred well. Finally, the pongal is ready to be blessed and served.

While Thai Pongal is an important Tamil festival for Tamils living around the world, it is celebrated differently in different countries. In Sri Lanka, Pongal is mostly celebrated as described above whereas in India, it is a three-day festival with a day dedicated for cows. A harvest day festival around this day is also celebrated across India and Nepal but called different names (Makara Sankranti, Lohri, Uttarayana, Magh Bihu etc.) in different regions and has different rituals.

Wish you a Happy Pongal!

Kurakkan Pittu

Kurakkan, also known as ragi, is a type of millet that is gluten-free and diabetic friendly. At home, the most common and popular form of pittu is the rice flour pittu. Occasionally, my mother makes the atta flour pittu or the kurakkan flour pittu.

Below is the simple recipe for making kurakkan flour pittu. The rice flour pittu and atta flour pittu easily blend with any curries and is a convenient meal to prepare. Kurakkan, however, has a distinctive taste that I find does not easily merge with just any curry. As such, I prefer to eat kurakkan pittu simply sprinkled with coconut and jaggery.

Kurakkan Pittu

Time taken: 25 mins

Serves 2

Kurakkan pittuIngredients:

  • Kurakkan flour/ ragi – 1 cup
  • Coconut – ¼ cup, freshly scraped
  • Jaggery – 2 or 3 tbsp, finely chopped
  • Salt – pinch

Method:

  1. Add a pinch or two of salt to the kurakkan flour.
  2. Stir in boiled and slightly cooled water until the flour mixtures becomes coarse and grainy.
  3. Steam the kurakkan pittu for 10 mins.
  4. Mix the freshly scraped coconut and chopped jaggery into the steamed pittu and serve hot.

Recipe source: Raji Thillainathan.

Atta Flour Pittu

Pittu is a dish that my mother often makes for dinner. She generally makes rice flour pittu. One of the varieties that she occasionally makes is the atta flour pittu, the recipe of which is given below.

Atta flour pittu

Time taken: 25 mins

Serves 2

Atta flour pittuIngredients:

  • Atta flour – 1 ½ cups
  • Coconut – 3 tbsp, freshly scraped
  • Salt – pinch

Method:

  1. Roast the atta flour over low heat for 5 mins.
  2. Remove from stove and add the salt.
  3. While still hot, stir in water at room temperature until the mixture becomes coarse, small particles.
  4. Add the freshly scraped coconut and mix well.
  5. Steam the pittu for 10 mins.
  6. Serve warm with any curry.

Recipe source: Raji Thillainathan.